GeneSpy user guide
This document should teach you all you need to know about GeneSpy.
Dependancies and installation
GeneSpy relies on a few Python modules, most notably : Tkinter, Matplotlib and Sqlite3.
To install GeneSpy:
- For MacOS, download last 8.5 version of ActiveTcl (MacOS 10.5+ : 8.5.18.0) from https://www.activestate.com/activetcl/downloads and install it.
- Download python from https://www.python.org/downloads/release/python-2714/ and install it.
- Extract GeneSpy in a directory.
- Launch setup.py with python (proxy managed only for MacOS and Windows, see proxy section for details).
- Alternatively, install manually the libraries Matplotlib and Tkinter.
To launch GeneSpy:
open GeneSpy.py with python
WARNINGS :
- The path of GeneSpy application AND database should not contain any special character (i.e. : “é”, “à” or “ê”).
- Installation requires administrator rights.
- If you encounter any problems during downloading this may be due to proxy. To fix it, see advanced section.
- GeneSpy can be launched on Windows, MacOS and Linux. Nevertheless, GeneSpy is really optimized for Linux and can lead to some issues on Windows and MacOS, particuarly in term of lag time, see Issues section.
How does GeneSpy work ?
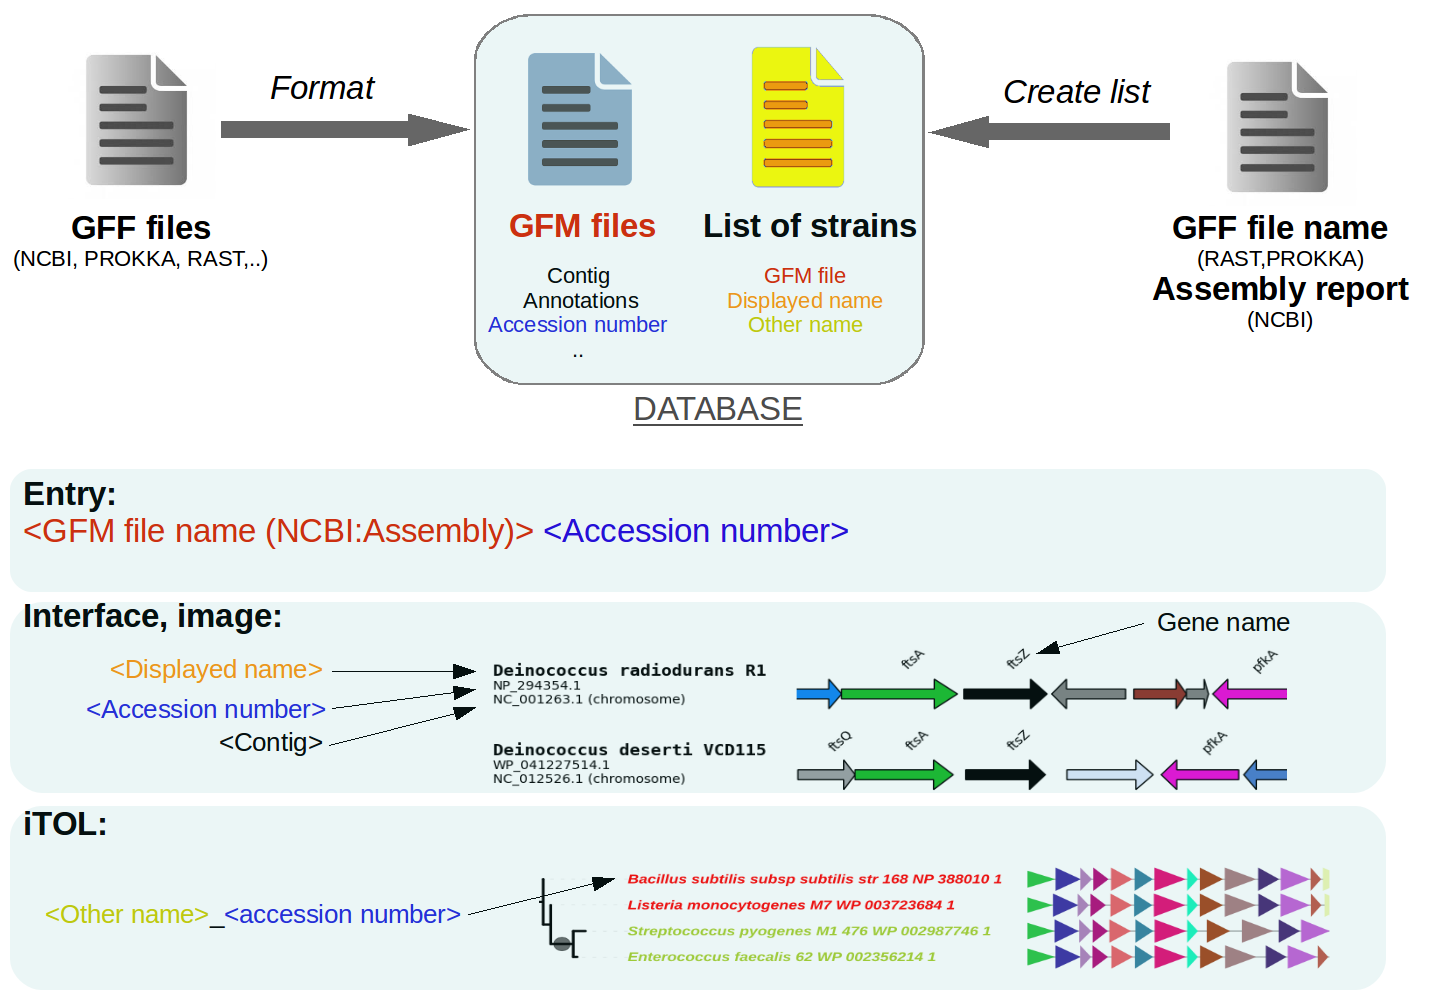
GeneSpy relies on a local database composed of a collection of GFM files (Gff File Minimal content) and a list of strains. The list of strains contains information related to genomes: the GFM file name and names that are displayed in interface/outputs. GFM files contain gene information contained in the genome. Also, a SQL database is used to speed up gene searches.
If you search a gene (<Assembly><Accession>), GeneSpy checks first if assembly is in the list, then searches in the related GFM file if accession number is present and retrieves all genes around the target. Then it will create a figure with the strain name and the genomic context.
The interface of GeneSpy

Manage a database
Build a local database
GeneSpy uses custom local databases, which means you are in charge of building your own !
The generation of the database is composed of 3 steps:
Downloading GFF files
Formatting the GFF database
Creating list of strains
You can use the 3 in 1 module (GeneSpy>Database>Basic Database) or the Advanced construction (GeneSpy>Database>Advanced …).
3 in 1 module of database construction
WARNING : The 3 in 1 module handles downloads from the NCBI FTP. If you are behind a proxy, you can configure GeneSpy to use it in the PATHS_PARAMS.ini file. See the proxy section for more details. Alternatively, you can download your files directly from the NCBI (see section Gathering GFF files (directly from NCBI)) for details).
The 3 in 1 module allows to build a local database very easily in a few clicks. This procedure consists of retrieving a list of NCBI FTP links and gathering GFF files and Assembly reports for a specific taxon. Then, GFM, SQL and list files are created automatically.
Search your taxon/species of interest.

- Select the relevant life domain.

- Select your desired assembly level (complete is advised) in “filters”.


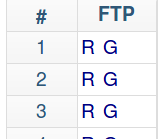
- Remove all and select FTP in “choose columns”.
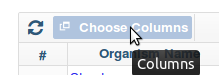


WARNING : Sometime, user has to select FTP twice to proper select this column. Check if it is selected.
- Click on “Download”.

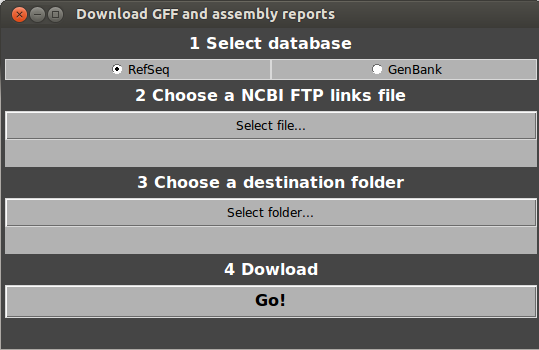
- Open GeneSpy and select Database>Basic database building.
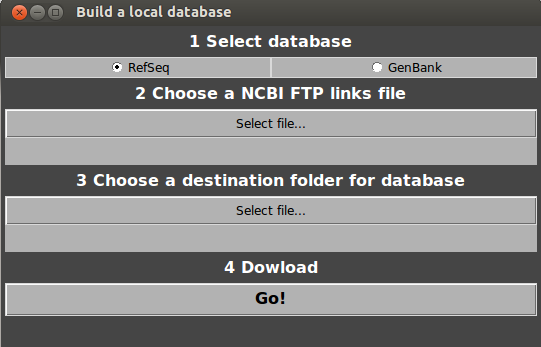
Choose RefSeq or GenBank.
Choose the file downloaded from NCBI (NCBI FTP links file).
Choose a destination folder for the GFF files.
Click on Go!
Database selection is automatically done using 3 in 1 module, your database is ready to use! To load data, go to Load data section! If a problem of connection occurs, an error message appears. You have the choice to try again or to abort download.
Separated modules of database construction
Gathering GFF files (directly from NCBI)
Search your favorite taxon/species.
Filters: select your desired assembly level.
Download GFF (from RefSeq or GenBank).
Download assembly statistics report (from RefSeq or GenBank).
Put GFF.gz and assembly report files in a same folder.
Go to Format section.
Gathering GFF files (from NCBI FTP links)
WARNING : The download module handles downloads from the NCBI FTP. If you are behind a proxy, you can configure GeneSpy to use it in the PATHS_PARAMS.ini file. See the proxy section for more details. Alternatively, you can download your files directly from the NCBI (see section Gathering GFF files (directly from NCBI)) for details).
Follow steps 1 to 6 of 3 in 1 module of Database construction.
Open GeneSpy and select Database>Advanced database building…>Download.
Choose RefSeq or GenBank.
Choose the file downloaded from NCBI (NCBI FTP links file).
Choose a destination folder for the GFF files.
Click on Go!
Go to Format section.
GeneSpy will handle the connection to the NCBI FTP and search all the GFF files for you. If a problem of connection occurs, an error message appears. You have the choice to try again or to abort download.
Gathering GFF files (other ways)
You can generate GFF files using annotation programs such as PROKKA and RAST. In this case, you have to put your GFF files in a folder and to inform GeneSpy that GFF files do not come from NCBI during format and list creation. Names of strains are generated from GFF files names (See Advanced section). Then, go to Format section.
Format
To be used by GeneSpy, all your GFF files must be indexed. This step creates GFM files that contain main information from GFF files. After that, GFF files are not used anymore, they can be archived. Also, SQL database is created at this step.
- In Genespy, select Database>Advanced database building…>Format.
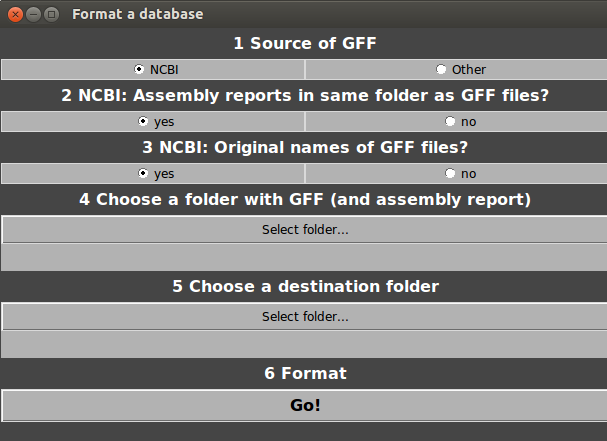
Select source of database (NCBI or other).
NCBI only, say GeneSpy if assembly reports are in same folder as GFF files.
NCBI only, say GeneSpy if you changed name of GFF files.
Select the folder containing your GFF files (and assembly reports).
Select a destination folder for the GFM and SQL files.
Click on Go!
Go to Strains list section.
Strains list
This list provides information about strains (Mainly names of strains) and is essential for GeneSpy. Only genomes present in this list can be used.
- In Genespy, select Database>Advanced database building…>Create list.

Select source of database (NCBI or other).
NCBI only, say GeneSpy if assembly reports are in same folder as GFF files.
NCBI only, say GeneSpy if you changed name of GFF files.
Select the folder containing your GFF files (and assembly reports).
Select a destination folder for the strains list.
Click on Go!
The format of the stains list : <Name of genome(GFM)><Displayed name of strain><Other name>. The strains list can be easily edited and sub-selections/sampling can be applied (see Advanced section)
Alternatively, you can use a custom list (see Advanced section).
Select and load a database
Finally, you should tell GeneSpy where to look for the GFM files and the list of strains (Automatically done for 3 in 1 module).
- Got to Database>Select GFM database… and select the GFM directory.
- Go to Database>Select strains list… and select the file containing the strains list.
Paths are saved, so you do not have to do this operation until you change your database.
Decoupling of GFM directory and strain list allows to link a GFM database to many lists (different sampling, different displayed names, …).
The strains list can be viewed and edited in Menu>Edit>Strains list…
- The state of the database is indicated in the box “Database”. This box displays:
The number of GFM files in the selected folder
The number of strains in the list file
The number of genomes that match between GFM collection and strains list (efficient genomes)
Clicking on this box displays the list of assembly numbers and their associated state. (Orphan GFM files, orphan strains in list or overlaping genomes). Here is an example of a database presenting all possibilities:
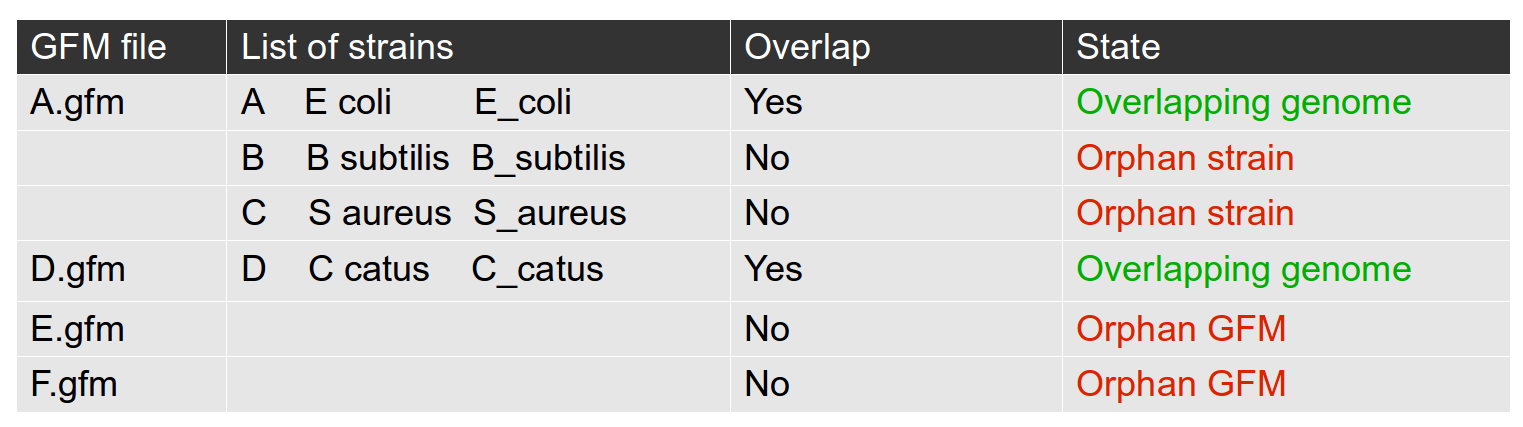
Using this list, you can identify potential problems in your database. Only overlapping genomes can be used by GeneSpy.
- When the database is selected and ready, go to Load data section!
Combine multiple databases/add new genomes
User can fuse many databases or add new genomes to a pre-existent database.
To combine several databases from the same source:
Retrieve collections of GFF (and assembly reports) in a same folder A.
Put all old GFM in the database directory B.
Perform Format, selecting A and B (New GFM and new SQL database will be created).
Create new strains list, selecting A and B.
Give paths to GeneSpy.
To combine several databases from NCBI and other sources (e.g. RAST):
Build databases independently in different repertories (GFF: directory A and B, GFM directory A’ and B’).
Put all GFM in the database directory C.
Format the database, selecting any folder (A or B) and C (Only SQL database will be created).
Concatenate all strains lists in a same file.
Give paths to GeneSpy.
Edit strains list
Sometime, default strains names does not fit with data/format. You can easily change strains names that are displayed on figures or that are exported in the iTOL format.
Go to Menu>Edit>Strains list…
Two panels are displayed. The first corresponds to the current list of strains and the second one corresponds to the sub-selection of strains.
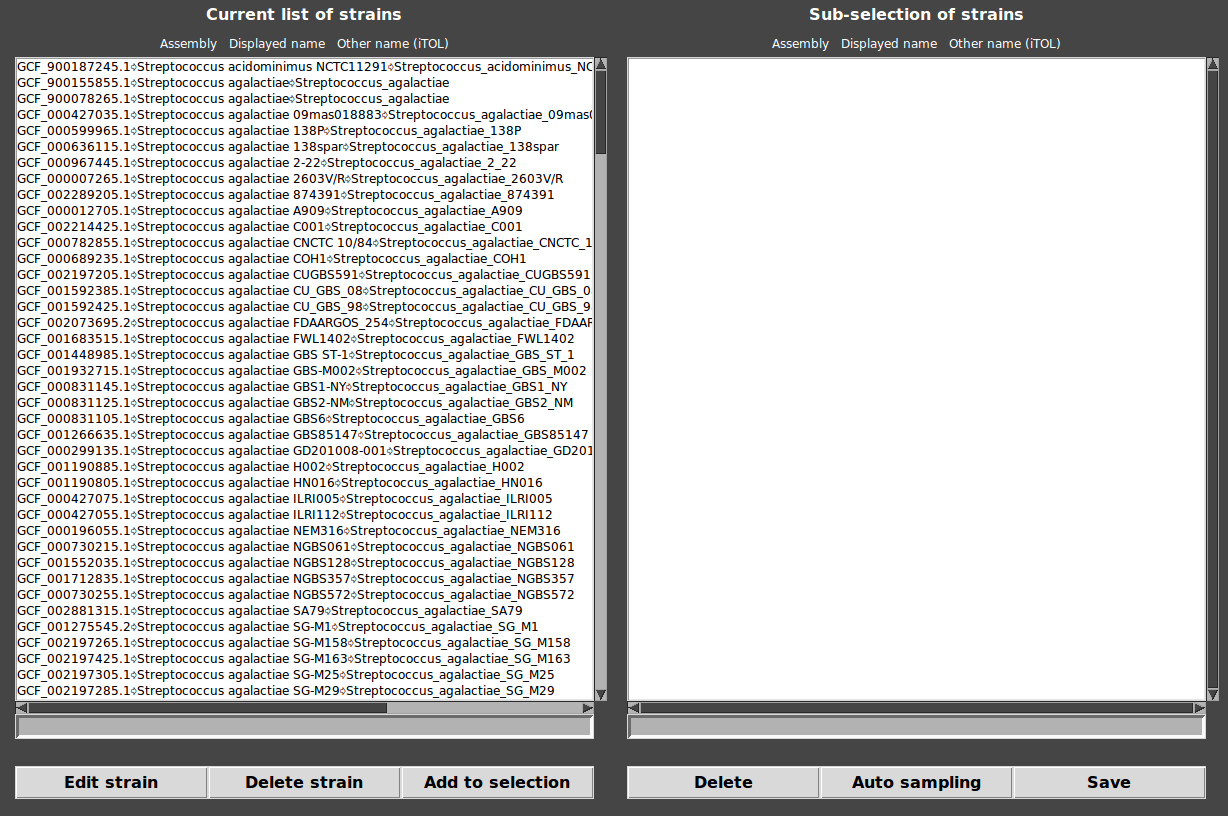
To edit names of strains:
click on the desired strain.
Edit the name in the entry at the bottom of the list.
Click on “Edit strain” and answer “yes”.
NB: the line has to be in format <Assembly>\t<Name of strain>\t<Other name>, else, the new name is not accepted.
To delete a strain:
click on the desired strain.
Click on “Delete strain” and answer “yes”.
Create a subdatabase
A subdatabase can be created, filtering genomes with the strains list.
Go to Menu>Edit>Strains list…
Two panels are displayed. The first corresponds to the current list of strains and the second one corresponds to the sub-selection of strains.
- Build the sub-selection:
Add a strain : Double click on any strain/click on any strain and click on “Add to selection”.
Delete a strain : Press “Suppr”/click on any strain and click on “Delete”.
To perform an automatic sampling (one strain per species) : click on “Auto sampling”.
Save the sub-selection : click on “Save”.
Import the new selection : Menu>Database>Select strains list.. and select the new file.
Load data
Now, all we need to generate a figure is a selection of target genes. There are multiple ways to select a set of target genes. The format expected by GeneSpy is quite simple, a tab separated tabular file with two columns :
genome assembly number (GCA_xxx for GenBank or GCF_xxx for RefSeq)
protein accession (WP_xxx ; YP_xxx ; XP_xxx ; …)
Also, GeneSpy can search target genes from accession numbers present in different types of files (BLASTP output files, Genbank files collection, list of accession numbers). In this case, GeneSpy has to search in its database if an assembly number is associated to the accession number and then provides the accepted format <Assembly> <Accession>.
To better understand how GeneSpy’s identifiers work, see Advanced section.
NB : The default format can be changed using Convert_IDs function (see Advanced section).
From a file of target genes
You can manually define a set of genes of interest in a tabular file and import it in GeneSpy.
Select Files>Load… and select your file (.txt)
NB : You can also load a file and export it directly without displaying the figure on interface (Files>Load and export…). By this way, there is no limit of number of loaded contexts (The only limitation is the height and width proportion of the final image).
From a keyword search
You have the possibility to search any gene in your database using the Search menu.
- In the field “Species/part of strains”, you can choose genomes to query.
- If you want to query entire database, keep this field empty.
- If you want to query specific genomes, type the name of strain/species you want (or just a part of the name).
Example : “bacillus” queries all genomes containing “bacillus” in the name (e.g. Bacillus subtilis, Bacillus thuringiensis).
Example : “entero” queries all genomes containing “entero” in the name (e.g. Enterococcus faecalis, Enterobacter cloacae).
In the field “keywords”, you can choose the keyword that will be searched in genomes. Example : “ribosomal” queries all genes containing “ribosomal” in their description (e.g. ribosomal protein S4, ribosomal protein 14).
Click on “search from keywords”/Press Enter to launch the search.
Click on “Add to selection”.
Click on “Load selection”.
Importantly, the search is not case sensitive.
From a NCBI BLASTP result
User can also find target genes from a simple NCBI BLASTP result file.
Ensure that you possess a NCBI GeneSpy database.
Go to https://blast.ncbi.nlm.nih.gov/Blast.cgi?PAGE=Proteins.
Choose a sequence of interest that you want to analyze.
Blast your sequence against a taxon corresponding to GeneSpy database (BLASTP).
Example : I’v got a GeneSpy database of Lactobacillus casei built from NCBI. I perform the NCBI BLASTP against Lactobacillus casei (field “Organism”).
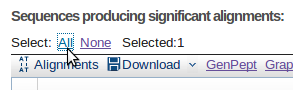
- Select All.
Download XML.
Menu>Search>from NCBI BLASTP output.
Select the database that you used to build your GeneSpy’s database (RefSeq/GenBank).
Select the XML file.
GeneSpy retrieves all accession numbers present in NCBI output file and tries to find corresponding accession numbers in GFM files. If some genes are found, they will appear in the Search window text box.
NB: At the end of the list of matches, the number of hits that have been found is indicated.
Click on “Add to selection”.
Click on “Load selection”.
From a local BLASTP result
User can also find target genes from a local BLASTP result file.
Ensure that you possess a protein sequence local database (FAA files) corresponding exactly to your GeneSpy database (GFF and GFM files). Accession numbers have to be the same in both databases.(See Advanced section to build local database).
Choose a sequence of interest that you want to analyze.
Perform a local BLASTP with output default parameters.
Ensure that accession numbers are present in output file.
Menu>Search>from local BLASTP output.
Type regular expression to fit with output file format: up and downstream of accession number, all regular expression has to cover the entire field “Sequences producing significant alignments”.
example 1:
Sequences producing significant alignments: (bits) Value
170187-000006885.1-Spneumoniae-@WP_050545454.1@[hypothetical … 836 0.0
The regular expression is « .+@» for upstream and «@.+» for downstream of accession number
example 2:
Sequences producing significant alignments: (bits) Value
170187-121155511511-PROTEIN~WP_00000045.1 836 0.0
The regular expression is « .+\~» for upstream and «$» for downstream of accession number
Choose an e-value threshold (ex: 1e-2 or 0.01 ; default 1e-4).
Select your BLASTP output file.
NB: At the end of the list of matches, the number of hits that have been found is indicated.
Click on “Add to selection”.
Click on “Load selection”.
From a GenBank collection
User can also load target genes from a collection of GenBank files (.gb and .gp). GeneSpy extracts all identifiers contained in GenBank files located in a given folder and searches in its database if some of them are indexed. Importantly, all genes present in GenBank files are searched, so if the GenBank file contains a whole genomic region, all genes will be searched! We suggest using GenBank files corresponding to individual genes.
Ensure that you possess a NCBI GeneSpy database.
Go to Menu>Search>From GenBank collection.
Select the folder containing GenBank files.
NB: At the end of the list of matches, the number of hits that have been found is indicated.
Click on “Add to selection”.
Click on “Load selection”.
From a list of accession numbers
User can load target genes from a file containing a list of acession numbers (1 accession number per line).
Go to Menu>Search>From accession list file.
Select the file containing accession numbers.
NB: At the end of the list of matches, the number of hits that have been found is indicated.
Click on “Add to selection”.
Click on “Load selection”.
From a selection
When you interact with the interface, you can select specific genes clicking on them.
- Mouse wheel click/Double left click selects any gene.
- Right click selects target gene.
The selection will be displayed in selection box in the form <Assembly><Accession>. The selection can be loaded clicking on “Load selection”. It displays selected genes.
Left click on genes displays important information about the given gene in the gene information box. Click on the box open a NCBI web page of the gene (works only if database comes from NCBI).
Order of contexts can be changed in a selection: use copy/paste to change the order in the selection box and load selection.
Save identifiers
Identifiers can be saved by many ways.
Any selection can be saved in a text file with a simple copy/paste.
A loaded selection can be saved in File>Save as… Identifiers are saved as text files.
A session can be saved in Files>Save session…. All identifiers and parameters are saved. Session can be opened in Files>Open session… If identifiers have been loaded from a file, the session saves the file path.
Customize the figure
General options
Many options are available to customize your figures:
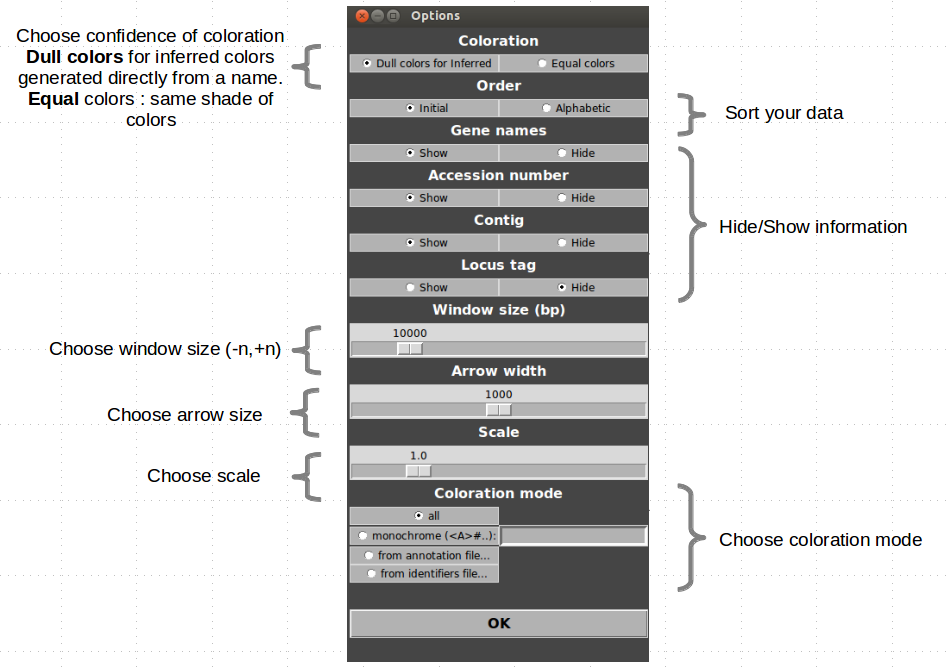
Custom colors
Automatic
Coloration is automatically generated from annotations. Name of gene and general biochemical function are used to infer families. A random color is attributed to each biochemical function and to each gene name. If a gene name and a function are related in a GFM file, the function will systematically take the color of the gene name.
Binding between color and name/function and binding between name and function can be edited in Edit>Color/Binding….(see Advanced section).
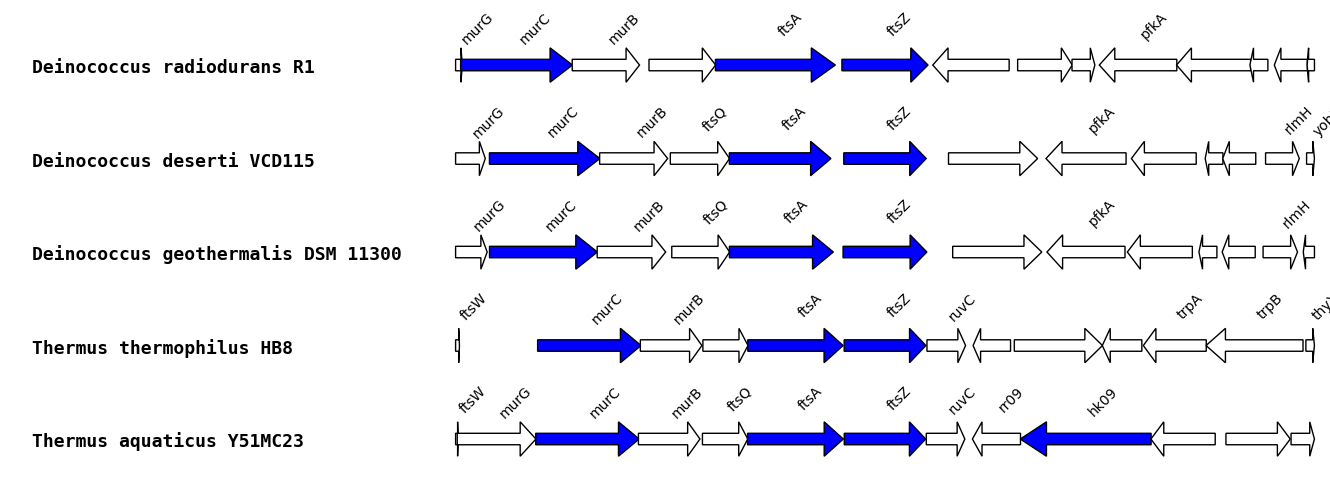
Monochrome
You can color genes of interest in blue using “monochrome:” and fill the box with annotations of your families, separated with “#”.
ftsa#ftsz#murc#sensor histidine kinase
From an annotation file
You can import a coloration file containing families to color. you can use any information to color (such as locus tag, accession number, name, function). Many annotations can be attributed to a same color.
Go to Options.
Select an annotation file using “from annotation file”.
Click on “OK” and refresh.

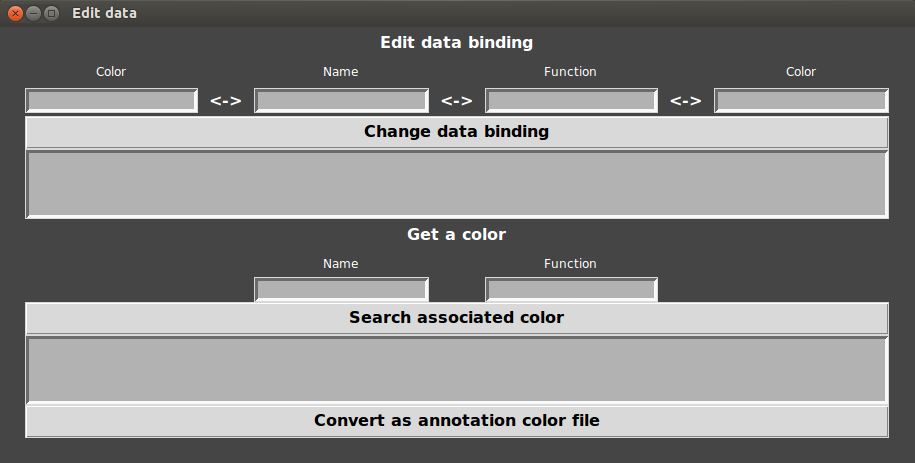
User can generate an annotation color file using preexisting colors saved in GeneSpy (generated automatically).
Go to Edit>Color/Binding.
type name/function of each family you want to color and click on “Search associated color”.
Example:
rpsL : rpsl #b09c97
rpsO : rpso #d1d8c2
NB : the search is not case sensitive.
Click on “Convert as annotation color file” and select an output file.
Go to Options and select the output file using “from annotation file”.
Click on “OK” and refresh.
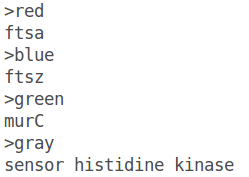
You can also add a name of the gene, just after the color, separated by a tabulation (e.g. : >red FtsZ).
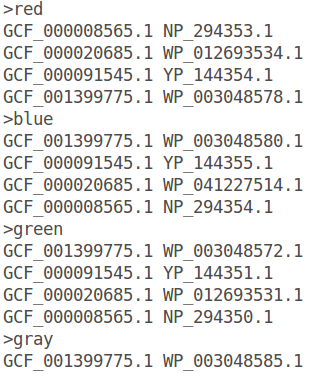
From an identifiers file
Another way to color specifically families of interest is to import an identifiers file. Colors are indicated using a “>” and gene identifiers are in tabular GeneSpy format.
Go to Options.
Select an identifiers file using “from identifiers file”.
Click on “OK” and refresh.
You can also add a name of the gene, just after the color, separated by a tabulation (e.g. : >red FtsZ).
User can generate an identifiers color file using preexisting tabular GeneSpy files.
Put all tabular files containing families to color in a same folder.
Go to Edit>Color/Binding.
Click on “Select a folder containing tabular files” and select the folder.
Select an output file.
Go to Options and select the output file using “from identifiers file”.
Click on “OK” and refresh.
NB : A random color is attributed to each family.
Export
To export your figures, Files>Export as …
Image files
iTOL
Images
GeneSpy offers a variety of export formats (depending on OS):
- png
- jpg
- tif
- svg
- eps
- multiple pdf
iTOL
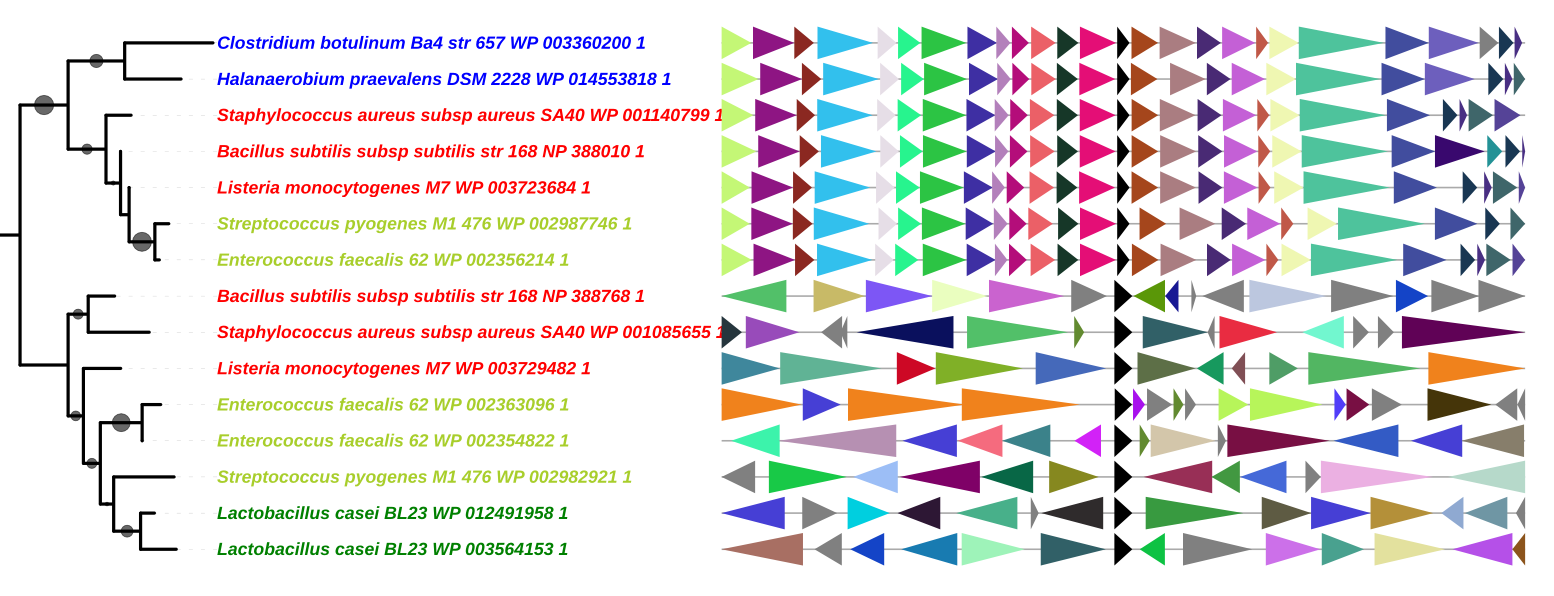
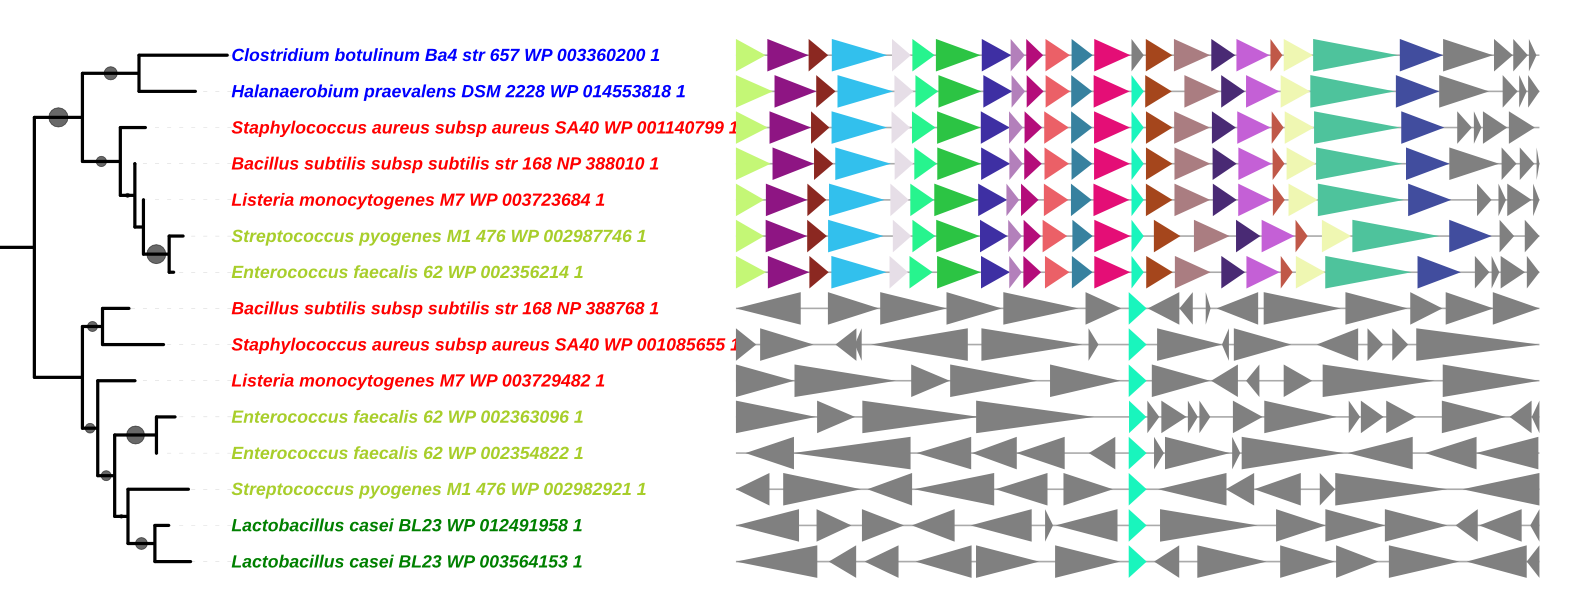
Using GeneSpy, you can directly bind genomic context information to a phylogeny. For this, you have to export your context as a text file that can be directly loaded in iTOL ([http://itol.embl.de/]).
Names of leaves in your tree have to be exactly the same as in the iTOL text file. That’s why different formats are proposed:
- Assembly
- Assembly_Accession
- Other name
- Other name_Accession
If default names generated by GeneSpy do not fit with your data, you can edit names manually in Edit>List of strains… or create a script that changes the list of strains. For that purpose, see Advanced data section.
Advanced Uses
Use the Convert_IDs function
GeneSpy provides the possibility to load IDs in a different format as the default format. This can be very conveniant if your data are not formatted as GeneSpy identifiers and to avoid repetitive file conversions. This possibility is provided by the function Convert_IDs in GeneSpy_tools.py script.
For example, I want to copy/paste leaves from a tree that are in this format: 484770_000725345_1_Psp_@WP_038667413_1. The aim is that GeneSpy understands directly this format and interprets it as GCA_000725345.1 WP_038667413.1.
Many conditions are required to use this function:
User has to have two databases: the first one containing original names (protein database, nucleic database, identifiers database, …) and a compatible GeneSpy’s database.
Assembly and accession numbers have to be included in the original names.
The formats are different (different separators, different order, ..).
The function takes a string as argument (a string corresponding to a line that has been given in a file or in selection box) and returns a string containing the assembly number and the accession number. Importantly, the separator in the final string is “#”. The function has to be edited to fit with your data.
Example 1:
I have an original protein database built from NCBI RefSeq and a GeneSpy’s database corresponding to the same genomes. I have inferred a tree from an alignment of sequences from this database. I want to load directly leaves from the tree (e.g. Copy/Paste from Figtree) in GeneSpy in the format:
484770_000725345_1_Psp_@WP_038667413_1
171540_000925743_1_Bsubtilis_@$WP_038456466_1
Original line : 484770_000725345_1_Psp_@WP_038667413_1
def Convert_IDs(string_id):
    string_id_genespy_format = ""
    try:
      "# this code is the adaptative part that has to be edited according to your needs #"
      accession_version = string_id.split("@")[1].split("_")
      version = accession_version.pop()
      accession = "_".join(accession_version)
      assembly = "GCA_"+string_id.split("_")[1]+"."+string_id.split("_")[2]
      string_id_genespy_format = assembly+"#"+accession+"."+version
      " #######################"
      return string_id_genespy_format
    except:
      return string_id
Formatted line : GCA_000725345.1#WP_038667413.1
Example 2:
I have an original protein database built from NCBI RefSeq and a GeneSpy’s database corresponding to the same genomes. I have retrieved sequences in a fasta file. I want to load directly the fasta file in GeneSpy in the format:
>GCA_000725345.1$4550012$WP_038667413.1
ATGGTTTGTAGCGATCGGGCTATCGAGTCTATCGGGCGCATAT
>GCA_000925743.1$171540$WP_038456466.1
ATGTAGCGGCTTAGGCCTCTTCGGAGGCTCTAGCGGGTATCTA
Original line : >GCA_000725345.1$4550012$WP_038667413.1
def Convert_IDs(string_id):
    string_id_genespy_format = ""
    try:
      "# this code is the adaptative part that has to be edited according to your needs #"
      accession_version = string_id.split("$")[2]
      assembly = string_id.split("$")[0].replace(">","")
      string_id_genespy_format = assembly+"#"+accession
      " #######################"
      return string_id_genespy_format
    except:
      return string_id
Formatted line : GCA_000725345.1#WP_038667413.1
NB : regular identifiers <Assembly> <Accession> can be also understood evenif the function is active. Convert_IDs just provides an alternative way to read identifiers in case the identifier is not readable.
Proxy
For installation
The setup.py script handles dependancies installations for GeneSpy. For Windows and Mac, python dependancies are installed using pip. If proxy setting is set in PATHS_PARMAS.ini, setup.py will try using the proxy adress.
For Linux distributions, the native package system (such as apt) is used to install dependancies. As such, system-specific proxy settings apply.
For automated downloads
By default, Genespy will use the system proxy setting for automated downloads. If none is set and downloads fail, you can configure GeneSpy to use a specific one.
Configuring a proxy for GeneSpy
If you are behind a proxy, you can configure GeneSpy to use it.
Open file “PATHS_PARAMS.ini”
Write the proxy adress in “Proxy” section (the field is empty by default).
Example: “Proxy http://user:password@proxy_address:port”
If automatic download still fails, contact your system administrator or see section Gathering GFF files (directly from NCBI).
Edition of links
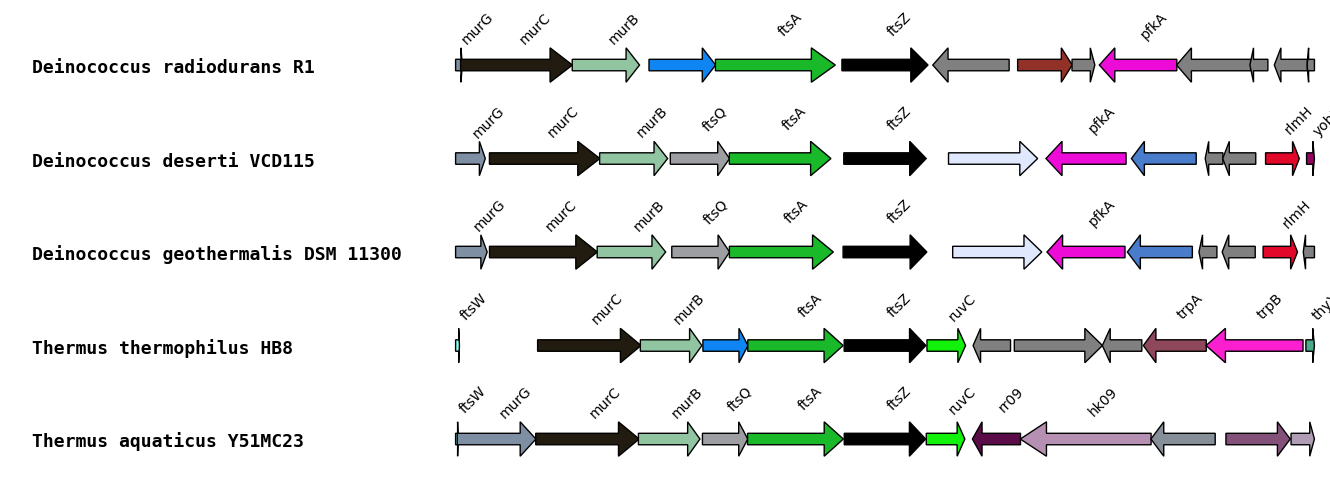
Links are sometime not optimal. In this example, the surrounded gene is FtsQ but is not annotated as such.

- That’s why GeneSpy provides a way to edit links between gene names and functions:
- Go to Menu>Edit>Color/Binding…
- Enter the name and the annotation in respective fields and click on “change data”.

GeneSpy first tests if annotation exists and then links the annotation to name. Any gene that has the annotation will display the name and the associated color. If the gene name did not exist, the default color is red.
- Refresh

If you want to erase a link between a name and a function, you can link the function to a “_” in name field. An inferred family is displayed in a dull color, this can be changed in Options>Coloration>Equal.
- Colors can also be changed:
- Enter the name or the annotation and double click on associated color entry.

- Select the desire color and click on “change data”.
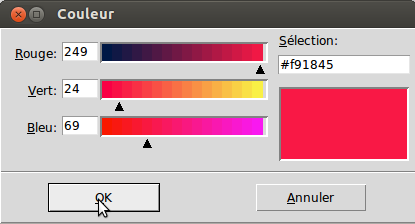

- Refresh

- You also can get a color of any gene name or function:

Keyboard shortcut
Open a file : Ctrl+o
Save as : Ctrl+s
Quit : Ctrl+q
Refresh : F5
Formats
Format of GFM files:
#Contig (l.1)
<inf>\t<sup>\t<orientation>\t<accession>\t<locus tag>\t<annotation>\t[<name>]Format of NCBI FTP links file:
“<RefSeq FTP>”,“<GenBank FTP>”Format of List of strains:
<Assembly>\t<Name of strain>\t<Other name (displayed in iTOL formats, useful to fit with phylogenies)>
More generally, assembly corresponds to the name of the GFM file.
Format of GFF files:
<Contig><source><region/gene/CDS><start><end><score><strand><phase><attributes>
attributes: Name=<Accession number> ; product=<Biochemical function> ; locus_tag=<locus tag> ; genome/type=<genomic/plasmidic> ; gene=<name of gene> ; ID=<Accession number> (RAST/PROKKA)Format of Target file:
<Assembly>\t<Accession>Format of NCBI BLASTP output (line of interest only):
xml (l.1)
blastp (l.5)
[<Hit_id>,<Hit_def>][ref,dbj,gb]|<Accession>[</Hit_id>,</Hit_def>]Format of local BLASTP output (line of interest only):
BLASTP (l.1)
<Hit (default: <Accession><Annotation>)> <Score> <e-value>Format of list of accession numbers:
<Accession number 1>
<Accession number 2>
<Accession number 3>Format of GenBank file (line of interest only):
LOCUS (l.1)
/protein_id=“<Accession>”Format of GenPept file (line of interest only):
LOCUS (l.1)
ACCESSION <Accession>Format of color file with annotation:
><color>
<Annotation (accession/locus tag/function/name)>Format of color file with identifiers:
><color>
>Assembly>\t<Accession>Format of iTOL specific format:
DATASET_DOMAINS
SEPARATOR COMMA
DATASET_LABEL,Genomic Context
DATA
<Leaf>,<windows lengh>,[TL,TR]|<begin>|<end>|<color>|<name>Format of SQL database:
Creation: IDS (<assembly>, <accession>)
Query: SELECT assembly FROM IDS WHERE accession=<Accession>
Loading data in GeneSpy
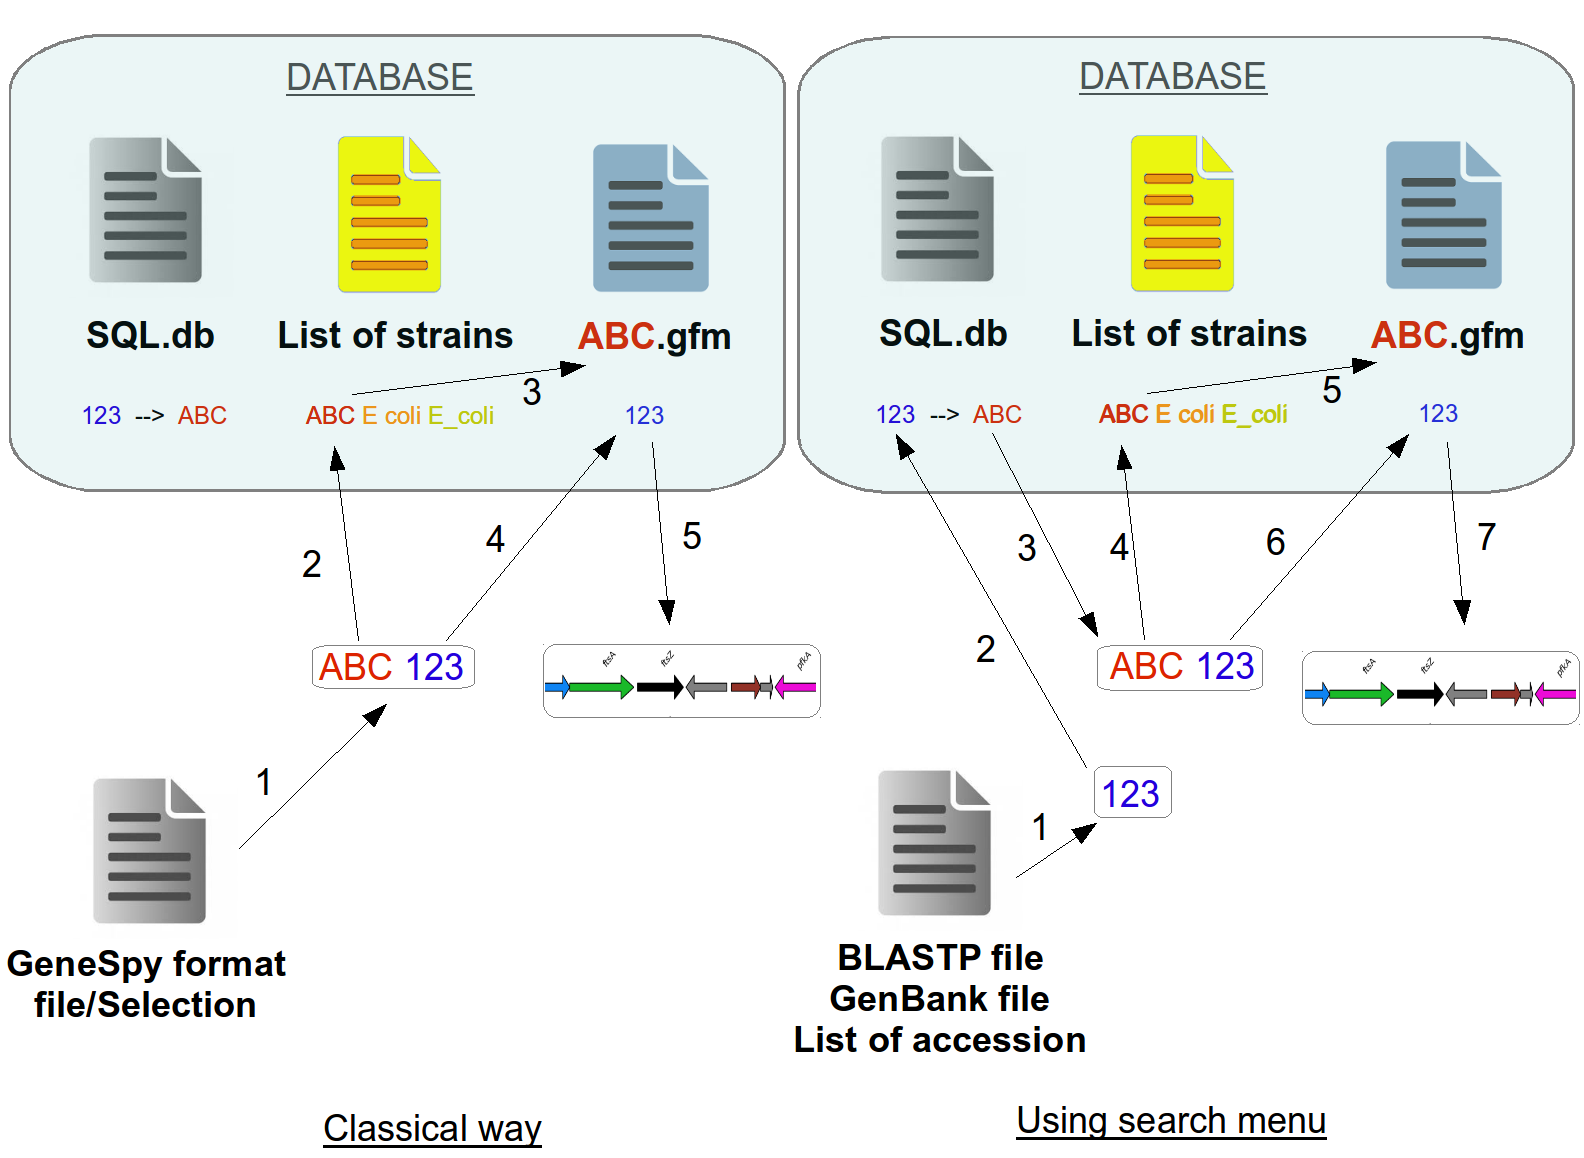
Classical way:
Extract content, check the format.
Check if ABC genome is in the list of strains.
Check if ABC.gfm exists.
Search 123 gene in ABC.gfm.
Generate the context.
Search menu (from file):
Extract content, check the format, extract accession numbers.
Search GFM files associated to this accession number in SQL database.
Contruct of the conventionnal ID.
Check if ABC genome is in the list of strains.
Check if ABC.gfm exists.
Search 123 gene in ABC.gfm.
Generate the context.
Databases
Databases formats
- Databases depend on sources

Perform a local BLASTP
- Build a proteic sequences local database to perform local BLASTP
First, you have to install Blastall and Formatdb (https://www.ncbi.nlm.nih.gov/books/NBK279690/).
Search your favorite taxon/species (same as GeneSpy database)
Filters: select your desired assembly level
Download Protein FASTA (from RefSeq or GenBank)
Uncompress all .faa.gz
Concatenate all files in one file (Unix : cat *.faa > <database_file.faa>)
Format the database using formatdb (formatdb -i <database_file.faa> -a F -p T)
Retrieve a proteic sequence of a target gene in a file
Perform a BLASTP (blastall -p blastp -d <database_file.faa> -i
-o )
Limits and known issues
Limits
Maximum number of contexts that can be displayed on interface : 330.
Maximum number of contexts that can be exported in images using “Load and export” : depending on the width and height of final image.
Maximum number of contexts that can be exported in iTOL using “Load and export” : no limit.
Known issues
Problem of installation:
If you have a SSL certificate issue during the installation of libraries, you can try to type in a terminal (Unix) "curl https://bootstrap.pypa.io/get-pip.py -o get-pip.py" and then "python2.7 get-pip.py".Problem of memory leak:
Using matplotlib and Tkinter causes a memory leak that is partially fixed sometimes. You can change memory threshold in PATHS_PARAMS.ini to minimize the number of restarts. Don’t panic if the window closes, all data are saved!Problem in MacOS:
Due to interaction between Tkinter and Matplotlib, GeneSpy can be very slow to clean dispayed figures when refreshing/loading new data and when scrolling in the frame containing figure.Problem in Windows:
Due to interaction between Tkinter and Matplotlib, GeneSpy can be very slow to clean dispayed figures when refreshing/loading new data.
© Pierre Garcia. Powered by RMarkdown.